今天给大家讲解一下帝国CMS7.5的用户提交表单,比如在线报名、反馈信息、留言等,可以帮助我们获得用户的信息,从而带来业务,实现方法如下:
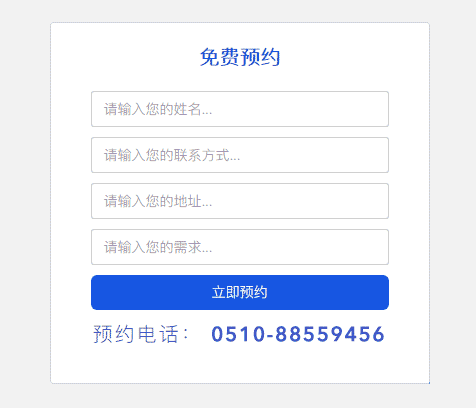
制作出来的效果如下:
方法步骤:
1、点击菜单栏的【插件】选项,然后再选择【信息反馈管理】中的【管理反馈分类】选项,在右侧点击【增加反馈分类】即可;注意,如果不增加,直接用默认系统的默认即可,理论上讲信息反馈分类是可以添加无数个的。
2、进入【增加反馈分类】页面,填写【分类名称】,勾选需要的表单选项,也可以在【字段管理】里面【新建字段】,然后提交即可;
3、将代码添加到需要表单的地方,在代码复制中需要替换的主要有以下两点需要特别注意:
<form name=’feedback’ method=’post’ enctype=’multipart/form-data’ action='[!–news.url–]e/enews/index.php’>
<input type=hidden name=bid value=2>
<input type=”hidden” name=”ecmsfrom” value=”url “>
<input name=’enews’ type=’hidden’ value=’AddFeedback’>
在上面的代码中需要注意action的值以及添加value提交值,其中value=?是表单的ID;value=”url “中url可以填写“/”也可以填写主页地址,其中<input type=”hidden” name=”ecmsfrom” value=”url “>的意思是反馈表单提交后返回到首页!
4、将制作好的表单模板粘贴到自定义单页模板即可;
另外将上面截图的表单代码贴出来,供大家学习使用(春哥仿站团队用的是默认信息反馈分类)
<form class="form index-form" name='feedback' method='post' enctype='multipart/form-data' action='../../e/enews/index.php'>
                        <div class="form-title">免费预约</div>
                        <input type="hidden" name="ecmsfrom" value="<?=$public_r['add_www.cgtblog.com.mwebsite']?>">
                        <input name='enews' type='hidden' value='AddFeedback'>
                        <input name='title' type='hidden' value='网站留言'>
                        <div class="form-group">
                            <input class="form-control name" type="text" name="name" placeholder="请输入您的姓名..." data-required="true" data-descriptions="name" value="">
                        </div>
                        <div class="form-group">
                            <input type="text" class="form-control phone" name="mycall" placeholder="请输入您的联系方式..." data-required="true" data-pattern="^0?1[0-9][0-9]\d{8}$" data-descriptions="telphone" value="">
                        </div>
                        <div class="form-group">
                            <input type="text" class="form-control" name="address" placeholder="请输入您的地址..." value=''>
                        </div>
                        <div class="form-group">
                            <input type="text" class="form-control area" name="saytext" placeholder="请输入您的需求..." data-required="true" data-descriptions="area">
                        </div>
                        <button class="btn btn-primary btn-block">立即预约</button>
                        <div class="form-phone">预约电话: <span><?=$public_r['add_www.cgtblog.com.guhua']?></span></div>
                    </form>
这样就ok了


Hi, this is a comment. To get started with moderating, editing, and deleting comments, please visit the Comments screen in the dashboard. Commenter avatars come from Gravatar.